Gateware Description
This section provides information about the FPGA gateware used in the LimeSDR family of boards, including interfacing, toolchains, and update mechanisms. For board-specific details (e.g., block diagrams, module breakdowns), refer to the following links. You can continue reading below for generic information applicable to all supported boards or jump to the specific board documentation:
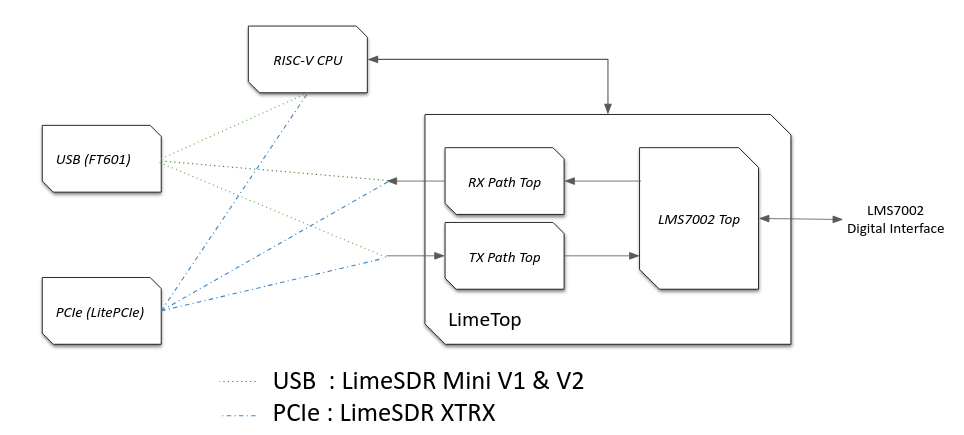
PCIe and USB Interfacing
The LimeSDR_GW framework supports two main high-speed host interfaces: PCI Express (PCIe) and USB 3.0. The interface choice depends on the board, required bandwidth, and host compatibility. PCIe offers higher throughput for demanding streaming, while USB provides simpler integration and broader accessibility.
Overview of Interface Options
Board |
Interface |
Notes |
|---|---|---|
LimeSDR Mini V1 |
USB 3.0 |
FT601 with LiteX wrapper |
LimeSDR Mini V2 |
USB 3.0 |
Same as V1, Yosys-compatible |
XTRX |
PCIe |
Uses LitePCIe core |
USB Interface (FT601)
The LimeSDR Mini boards (V1 and V2) use the FTDI FT601 chip for USB 3.0 connectivity. This is wrapped in a reusable LiteX USB core with multiple endpoints:
Control/Status endpoints for configuration, monitoring, and command handling (e.g., GET_INFO, LMS_RST).
Streaming endpoints for RX/TX I/Q data transfer via FIFO.
The core builds on the original LimeSDR USB HDL but fits seamlessly into LiteX’s SoC, using CSRs and Wishbone buses for communication. Firmware manages USB packet processing, FIFO reads/writes, and host interactions.
Boards using USB:
LimeSDR Mini V1
LimeSDR Mini V2
PCIe Interface (LitePCIe)
The XTRX board uses PCI Express, based on the open-source LitePCIe core (at https://github.com/enjoy-digital/litepcie). This enables:
Memory-mapped (MMAP) access via BAR regions for register control and DMA setup.
Streaming (DMA) for high-speed RX/TX I/Q data.
Interrupt support.
LitePCIe integrates closely with LiteX’s SoC, including tools for auto-generating Linux drivers. Firmware handles PCIe command processing, and MMAP interactions.
Board using PCIe:
LimeSDR XTRX
Testing and Debugging Interfaces
For USB (FT601):
Basic Functionality: Use LimeSuiteGUI to detect the board and read/write control/status registers.
Streaming Test: Run LimeSuite CLI (e.g., LimeQuickTest) or GNU Radio with gr-limesdr for RX/TX validation.
Firmware Validation: Check Control/Status endpoints for proper packet handling (e.g., via USB analyzers or logs).
For PCIe (LitePCIe):
MMAP/DMA Test: Use LitePCIe utilities like litepcie_util, litepcie_dma_test, and litepcie_probe for access and performance checks.
Generic Debugging Tool:
LiteScope: Integrate this logic analyzer into the SoC to monitor USB/PCIe signals in the FPGA, useful for FSMs, stalls, or behaviors. For details on adding a host bridge to enable LiteScope communication, see the LiteX Wiki page on Use Host Bridge to control debug a SoC. For instructions on integrating and using LiteScope itself, see the LiteX Wiki page on Use LiteScope To Debug A SoC.
Tip: Use LiteX BIOS for initial MMAP register checks before higher-level tools.
Toolchains
This section offers a detailed overview of the FPGA synthesis toolchains used for supported boards in the LimeSDR_GW project, ensuring reproducibility and helping new developers set up environments. It also covers the RISC-V firmware toolchain, which LiteX can install automatically for convenience.
FPGA Synthesis Toolchains
Different synthesis tools are used based on the FPGA vendor and family:
Board |
FPGA |
Toolchain |
|---|---|---|
LimeSDR Mini V1 |
Altera MAX10 |
Intel Quartus Prime Lite |
LimeSDR Mini V2 |
Lattice ECP5 |
Yosys + nextpnr-ecp5 |
XTRX |
Xilinx Artix-7 |
Xilinx Vivado |
Notes:
For Intel MAX10, Intel Quartus Prime Lite Edition is sufficient (Quartus Pro is not required).
For Lattice ECP5, the open-source Yosys/nextpnr-ecp5 toolchain is employed.
For Xilinx Artix-7, Xilinx Vivado (WebPACK or Standard edition) is required.
The LiteX build system automatically detects the board and selects the appropriate toolchain, generating project files, constraints, and build scripts tailored to the vendor.
RISC-V Firmware Toolchains
For soft RISC-V CPUs (e.g., VexRiscv or PicoRV32), a RISC-V toolchain compiles the firmware (BIOS or application). LiteX simplifies installation and management:
The recommended toolchain is riscv64-unknown-elf-gcc with newlib (no OS), targeting rv32im or rv32ima based on CPU features.
Installation:
Use LiteX’s setup script for automatic installation:
./litex_setup.py init install --toolchain riscv
LiteX handles firmware compilation, linker scripts, and Board Support Packages (BSPs) for the selected CPU, embedding the binary into the FPGA bitstream. Override defaults with –riscv-cpu and –cpu-variant options if needed.
Gateware Update Mechanism
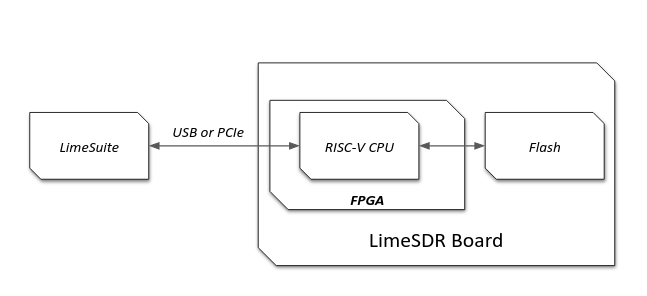
This section describes the process for updating the FPGA gateware (bitstream). Updates focus on flashing the bitstream to non-volatile storage (Flash), enabling the FPGA to load it automatically on power-up. The soft CPU firmware handles update commands from the host, with LimeSuite as the primary tool for managing the process on the host side.
Overview
Firmware updates use the host interfaces (USB or PCIe) to transfer bitstream data to the soft CPU firmware, which then manages writing to Flash. This ensures updates are persistent and reduces the need for volatile loads. Key concepts include:
Firmware Role: The soft CPU (e.g., VexRiscv) acts as an intermediary, processing host commands to erase Flash sectors, program pages, and handle data integrity.
LimeSuite Communication: The host tool (LimeSuite) initiates updates, sending commands and bitstream data in segments over the interface, with firmware responding with statuses (e.g., success or error).
Multiboot Support: Allows multiple bitstream images in Flash (e.g., a reliable “golden” image and an update image), with automatic fallback on failure for recovery.
Portability: LiteX abstracts Flash access (via LiteSPI), making the mechanism consistent across boards and FPGA vendors.
This approach minimizes risks during updates and supports shared firmware across all LimeSDR variants.
Update Process
Updates are typically performed using LimeSuite (e.g., via LimeUtil –update or GUI features):
LimeSuite connects to the board over USB/PCIe and sends update commands along with bitstream data in segments.
The firmware receives these via control endpoints, validates the data, erases relevant Flash areas, and writes the bitstream.
Additional handling for non-volatile data like VCTCXO DAC values or serial numbers, stored in specific Flash offsets.
For USB-based boards (Mini V1/V2), this uses FT601; for PCIe (XTRX), it leverages LitePCIe.
Multiboot Across FPGAs
Multiboot enables safe updates by supporting multiple images in Flash:
Store a golden image at the base address and updates at an offset.
On power-up, the FPGA loads the primary image; if it fails (e.g., due to corruption), it falls back to the golden one automatically.
Vendor differences (e.g., Intel MAX10 uses CFM partitions, Lattice ECP5 uses configuration registers, Xilinx Artix-7 uses ICAP) are handled transparently, with firmware setting boot flags or addresses.
This provides robustness, especially for remote or field updates.
Testing and Recovery
Post-update verification via LimeSuite (e.g., check firmware version or run diagnostics like LimeQuickTest).
If issues arise, multiboot falls back to the golden image; JTAG serves as a last-resort recovery.
Use tools like LiteScope for debugging Flash interactions during development.